
Zippers are not only functional parts of clothes because they are also stylish and trendy design embellishments. However, a stuck or broken zipper can probably lead to one of the most embarrassing moments of your life and ruin an impeccably good garment.
Continue reading below to learn how to fix separated or broken zippers easily:
What Do You Need?
Supplies
- Bar of soap
- Strong thread
- WD-40 lubricant
Tools
- Hand sewing needle
- Pencil
- Scissors
- Small needle-nosed pliers
Once you have prepared all the supplies and tools you need, here are the steps you need to follow:
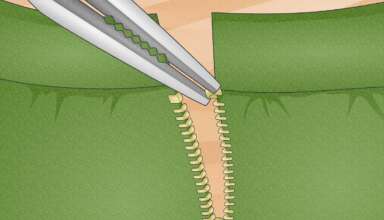
- Detach the Bottom Stop of the Zipper
Pry off the bottom stop of the zipper using the pliers to get a good grip. The bottom stop is that small band of plastic or metal at the lower part of the zipper teeth. If there are no pliers available, you can often pry it off with the end of a kitchen knife or a flat-head screwdriver.
- Position the Zipper Pull
After you remove the plastic or metal stop, use the pull tab for moving the zipper slider all the way down to the bottom of the zipper right under the last “teeth”.
- Readjust the Zipper Teeth
You can now realign the zipper teeth for all of them to mesh smoothly. In case you can’t get everything to mesh smoothly, don’t forget to mark the area where there is an issue aligning the teeth. The teeth might be damaged in that area and will never align correctly.
- Relocate the Zipper Pull
Move up the slider to the top of the zipper and close as many teeth as possible.
- Thread the Sewing Needle
Use a fine-weight monofilament fishing line or heavy thread to thread the sewing and then tie a knot at the tip. If there is no heavy or buttonhole thread, you can just double the thread and tie the knot at the tip of both strands.
- Make a New Zipper Stop
Pull up the thread through the zipper forming the knot on the zipper’s wrong side. Make 6 or 7 stitches across the lower part of the zipper where the old stop was removed to form a new stop made from the thread. Just make sure that the zipper slider or pull is right on top of the spot where you are repairing.
- Repair Above the Damaged Teeth
If the zipper teeth are damaged higher up on the zipper, you can move the pull slider on top of the damaged spot and sew the new zipper stop right on top of the damaged teeth. It will shorten the zipper’s length and keep it closed. You might need to whipstitch over the lower portion of the zipper teeth to prevent the zipper from opening.
- Secure the Thread
After you are done sewing, finish off by pushing the needle to the zipper’s wrong side, tying a knot then snip off any spare thread.
If the separated or broken zippers are already damaged beyond repair, you can always buy a zipper tape – roll by the yard to replace the old ones and use your favorite items all over again.